Setting up an AWS to Digital Ocean Site-to-Site VPN with strongSwan
Updated:
I just spent many hours over the course of several days figuring out how to set up a VPN between AWS and Digital Ocean with strongSwan.
I had to piece together various blog and forum posts to get this to work.
Why might you want a Site-to-Site VPN between Digital Ocean and AWS?
First, let’s go over why a VPN connection between AWS and Digital Ocean might be useful for you.
Say you wanted to migrate from Digital Ocean to AWS, but you didn’t want to have to migrate all your services in one go. You can start by making new microservices on AWS infrastruture while leaving your existing services on Digital Ocean. The site-to-site VPN allows your new services in AWS to call existing services on Digital Ocean.
Setup
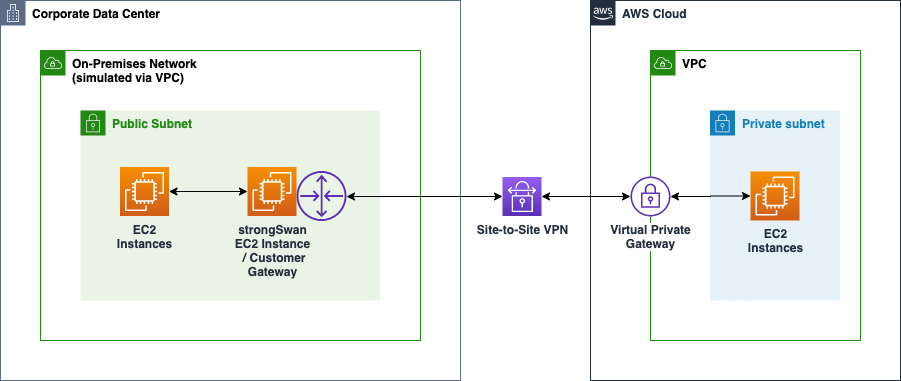
The desired topology will look like this, where “Corporate Data Center” is Digital Ocean.
You can read more about it on AWS’s blog.
Creating Digital Ocean Droplet
First, you’ll need a Digital Ocean droplet that will be your customer gateway on AWS’s side. This droplet will be running strongSwan and act as your VPN server into your Digital Ocean VPC.
Create a droplet in the desired VPC. For the purposes of this guide, I’ll be assuming you’re using Ubuntu. The resourcing of the droplet can be up to you. Make sure you have an ssh key so that you can ssh onto the droplet.
Keep a note of the VPC IP cidr, public, and private IPs of the droplet.
Creating AWS Resources
Next, we’ll create the AWS resources, starting with the customer gateway. The customer gateway refers to your Digital Ocean droplet.
Log into your AWS Console.
- Create a VPC if you don’t already have one.
- Go to customer gateways
- Click
Create customer gateway - Fill out the name as you wish. Keep the BGP ASN the default. For the IP address, put in the public ip address of the Digital Ocean droplet we created in the previous step.
- Click
Create customer gateway
Now it’s time to create your Virtual Private Gateway. This is what will allow traffic into your VPC.
- Go to Virtual Private Gateways
- Click
Create virtual private gateway. - Name it as you please, leave the default
Amazon default ASNin place. - Click
Create virtual private gateway
Next, we’ll make the VPN connection that ties the customer gateway and the virtual private gateway together.
- Go to Site-to-Site VPN Connections.
- Click
Create VPN connection - Name it as you please
- For
Target gateway type, make sureVirtual private gatewayis selected and in the dropdown select theVirtual private gatewaythat you created earlier. - Do the same for
Customer gateway. - For routing options, it’s important that you select
Staticand notDynamic. If you selectDynamicthen you won’t see the strongSwan configuration for download later on. - Click
Create VPN Connection
In a few minutes you’ll see the VPN State go from Pending to Available.
If you inspect the VPN connection and go to the Tunnel details tab, you’ll see that AWS created two tunnels for you and both will have a status of Down.
One thing that confused me was why there were two tunnels, so here’s a quick explaination. You only need one tunnel for the site-to-site VPN to work. There’s an additional tunnel for redundancy. If you wanted to create both tunnels, they would be separate instances in your on-premises network, or in this case, Digital Ocean.
Note the tunnel’s outside IP address and inside IPv4 CIDRs. You’ll need them later when configuring the VPN server in Digital Ocean.
- Download the configuration for your VPN by selecting it in the AWS console and clicking
Download Configuration.
Here, you’ll be prompted for the VPN Vendor and Platform. Select strongSwan and Ubuntu. Then click Download
Finally, we’ll need to turn on Route Propagation.
- Go to your AWS VPC.
- Click on your
Main route table. Note: If you have differents routes on your subnets you might need to configure those. - Go to
Route Propagationunder your route table. - Click
Editand checkEnablefor yourVirtual private gateway.
Setting up the Digital Ocean strongSwan VPN server
- SSH into your Digital Ocean droplet.
- Install strongswan
Assuming you’re using Ubuntu, you can install it with apt:
sudo apt-get update
sudo apt-get install -y strongswan
- Open up the
strongswanconfiguration for Ubuntu that you downloaded earlier. - Follow the instructions for
Tunnel 1. We won’t be coveringTunnel 2in this guide, but it’s essentially the same thing on a different droplet in your VPC. ONLY DO the steps in #1 Enable Packet Forwarding and Configure the Tunnel DoAutomated Tunnel Healthcheck and Failoverand skips steps #2 - #5.
I’m going to highlight a few things that were confusing to me in their instructions.
In the configuration for the Tunnel1, there’s a comment and line that looks like this:
## Uncomment the following line to utilize the script from the "Automated Tunnel Healhcheck and Failover" section. Ensure that the integer after "-m" matches the "mark" value above, and <VPC CIDR> is replaced with the CIDR of your VPC
Where it says <VPC CIDR> here, they mean the AWS VPC CIDR, NOT the Digital Ocean VPC CIDR.
You can find your Digital Ocean VPC CIDR in your Networking page here:
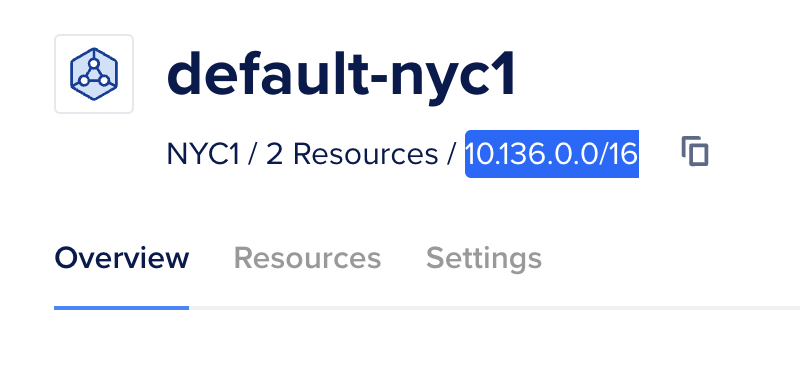
Once you’ve followed the instructions and have everything set up and restarted strongSwan with sudo ipsec restart, in a few minutes you should see the Tunnel1 go from DOWN to UP in the AWS Console.
You can also do the debugging steps at the bottom of the VPN instructions to ensure that everything is configured properly.
sudo ipsec status # Ensure that your Tunnel1 is ESTABLISHED
If you’ve done things correctly, at this point you should be able to ping from an EC2 instance on AWS to your Digital Ocean instance. You should not be able to ping from your Digital Ocean VPN server to an EC2 instance yet!
Finally, and here’s the key step that took me forever to figure out:
You need to add your private VPN’s internal CIDR as a static route on your VPN. It’s the CIDR range that starts with 169.254.X.X/30. Once that’s in place and you give it a couple minutes, you should be able to ping from Digital Ocean to AWS and receive a response.
NAT setup on DO VPN instance
Once the tunnel is set up, you need to set up a NAT to translate the source IP to be the private IP of the DO VPN server:
iptables -t nat -A POSTROUTING -o eth1 -j SNAT --to <PRIVATE IP>
This will enable you to access other DO instances from AWS.
Note: iptables settings do not persist after reboot by default so you will need to save and persist them somehow.
For ubuntu:
sudo iptables-save > /etc/iptables/rules.v4
sudo apt install iptables-persistent
sudo systemctl enable netfilter-persistent.service
Credit to this article.
Making the tunnel start on reboot
In step #5 Persistent Configuration, skip the iptables part and do the third step that involves editing /etc/network/interfaces.
Resources
- https://gist.github.com/kosyfrances/4a9334ac3e01c9c3e93bfc90e38f0418
- https://forums.aws.amazon.com/thread.jspa?threadID=286780
- https://docs.digitalocean.com/products/networking/vpc/resources/droplet-as-gateway/
- https://www.cyberciti.biz/faq/how-to-save-iptables-firewall-rules-permanently-on-linux/
Master GitHub Actions with a Senior Infrastructure Engineer
As a senior staff infrastructure engineer, I share exclusive, behind-the-scenes insights that you won't find anywhere else. Get the strategies and techniques I've used to save companies $500k in CI costs and transform teams with GitOps best practices—delivered straight to your inbox.
Not sure yet? Check out the archive.
Unsubscribe at any time.